
저장을 습관화
MySQL sequelize 연습 기록 본문
메모
작업 환경 Windows 10, VSC, sequelize, MySQL, AWS
mysql-sequelize 초기 환경 구성
0. npm 시작
$ npm init -y
1. 필요한 라이브러리 설치
1-1. express, sequelize, mysql2 라이브러리 설치
$ npm install express sequelize mysql2
1-2. sequelize-cli, nodemon 라이브러리를 DevDependency로 설치
sequelize-cli는 sequelize 명령어를 터미널에서 직접 실행할 수 있게 해주는 도구이다
$ npm install -D sequelize-cli nodemon
1-3. 설치한 sequelize를 초기화 하여, sequelize를 사용할 수 있는 구조를 생성합니다.
$ npx sequelize initconfig, migrations, models, seeders 폴더가 생성됨을 확인할 수 있다
2. package.json 내용 추가
...
"scripts": {
"start":"nodemon app.js"
},
...
3. config/config.json 파일 설정
"username" : AWS RDS DB 생성할때 입력한 마스터 사용자
"password" : AWS RDS DB 생성할때 입력한 마스터 사용자
"database" : 사용할 DB의 이름
"host" : AWS RDS DB 생성 후 발급받은 엔드포인트
"dialect" : "mysql" 다른 DB(postgres 등) 사용할거면 그거
4. DB 생성
$ npx sequelize db:createVSC 좌측 하단 MYSQL -> 연결 중인 RDS 하단에서
/config/config.json 파일의 "database" 항목으로 설정해줬던 이름의 DB가 생성됨을 확인
5. models, migrations 파일 생성
$ npx sequelize model:generate --name Posts --attributes title:string,content:string,password:string
/migrations/(생성일시)-create-posts.js
/models/posts.js
파일 확인
sequelize의 model은 Javascript에서 MySQL의 테이블을 사용하기 위한 다리 역할을 수행한다
migration 파일은 테이블을 생성하는 것이라면,
model 파일은 MySQL과 실제 연결되어 사용할 수 있게 도와준다
sequelize의 model을 사용하지 않고 DB 테이블을 조회한다면 select.. from.. where.. 등의 raw query문을 사용해야 한다.
SELECT postId, title, content, createdAt, updatedAt
FROM Posts;

VS

cosnt { Posts } = require("./models");
const posts = Posts.findAll();
6. DB 테이블 생성
# migrations 폴더에 정의된 migration 파일들과 MySQL의 테이블을 맵핑시킵니다.
$ npx sequelize db:migrate
모든 migrations 파일을 바탕으로 테이블을 생성한다.
config.json에서 "database"의 이름으로 등록해준 DB 밑에
Posts, SequelizeMeta 테이블이 생성된 것을 확인가능
작업을 취소하고 싶다면
$ npx sequelize db:migrate:undo
테이블에 데이터를 직접 삽입하고 싶다면
$ npx sequelize seed:generate하지만 나는 node.js를 이용하여 데이터를 삽입할 예정
7. migration 파일 수정
예시
createdAt, updatedAt에
defaultValue: Sequelize.fn("now"), 옵션 추가
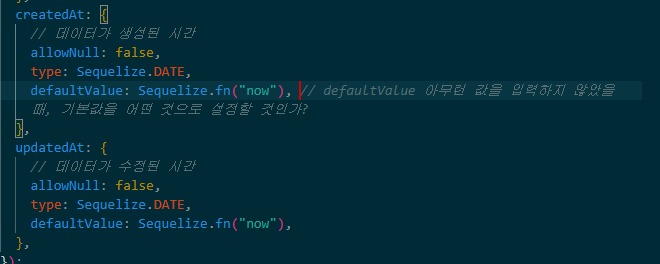
defaultValue는 아무런 값을 입력하지 않았을때, 기본값을 어떤값으로 설정할 것인가라는 의미이고
Sequelize.fn("now"); 자동으로 현재 시간을 입력함
migration 파일의 수정이 완료되었다면
가장 최근의 마이그레이션 수행을 취소하고
$ npx sequelize db:migrate:undo
마이그레이션 작업을 재수행함
$ npx sequelize db:migrate
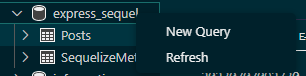
이후 DB 우클릭 -> refresh -> DB 우클릭 -> New Query 클릭 후
desc (테이블 명) 입력후 우클릭 -> Run MySQL Query를 클릭해주면 현재 상황을 확인할 수 있음
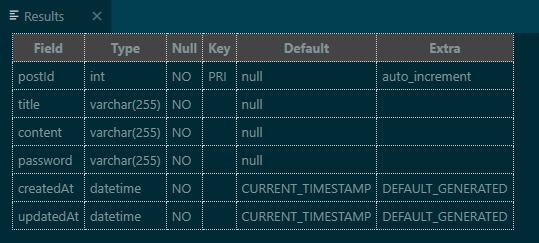
예시, 아래와 같은 상황에서 DB 우클릭 -> Refresh, New Query
DESC (테이블 명) 실행

현재 DB의 상태 확인
8. models 파일 수정
migrations에서 설정했던 내용과 동일하게 수정
- before
- /models/posts.js
"use strict";
const { Model } = require("sequelize");
module.exports = (sequelize, DataTypes) => {
  class Posts extends Model {
    /**
     * Helper method for defining associations.
     * This method is not a part of Sequelize lifecycle.
     * The `models/index` file will call this method automatically.
     */
    static associate(models) {
      // define association here
    }
  }
  Posts.init(
    {
      title: DataTypes.STRING,
      content: DataTypes.STRING,
      password: DataTypes.STRING,
    },
    {
      sequelize,
      modelName: "Posts",
    }
  );
  return Posts;
};
- after
- /models/posts.js
1. Posts.init()내의 모든 type을 Sequelize에서 Datatypes로 변경
"use strict";
const { Model } = require("sequelize");
module.exports = (sequelize, DataTypes) => {
  class Posts extends Model {
    /**
     * Helper method for defining associations.
     * This method is not a part of Sequelize lifecycle.
     * The `models/index` file will call this method automatically.
     */
    static associate(models) {
      // define association here
    }
  }
  Posts.init(
    {
      postId: {
        allowNull: false,
        autoIncrement: true,
        primaryKey: true,
        type: DataTypes.INTEGER,
      },
      title: {
        type: DataTypes.STRING,
        allowNull: false,
      },
      content: {
        type: DataTypes.STRING,
        allowNull: false,
      },
      password: {
        type: DataTypes.STRING,
        allowNull: false,
      },
      createdAt: {
        allowNull: false,
        type: DataTypes.DATE,
        defaultValue: DataTypes.NOW,
      },
      updatedAt: {
        allowNull: false,
        type: DataTypes.DATE,
        defaultValue: DataTypes.NOW,
      },
    },
    {
      sequelize,
      modelName: "Posts",
    }
  );
  return Posts;
};
2. 상단에서 변수 Sequelize를 선언하고, type Sequelize 그대로 사용
"use strict";
const { Model } = require("sequelize");
const Sequelize = require("sequelize");
module.exports = (sequelize, DataTypes) => {
  class Posts extends Model {
    /**
     * Helper method for defining associations.
     * This method is not a part of Sequelize lifecycle.
     * The `models/index` file will call this method automatically.
     */
    static associate(models) {
      // define association here
    }
  }
  Posts.init(
    {
      postId: {
        allowNull: false,
        autoIncrement: true,
        primaryKey: true,
        type: Sequelize.INTEGER,
      },
      title: {
        type: Sequelize.STRING,
        allowNull: false,
      },
      content: {
        type: Sequelize.STRING,
        allowNull: false,
      },
      password: {
        type: Sequelize.STRING,
        allowNull: false,
      },
      createdAt: {
        allowNull: false,
        type: Sequelize.DATE,
        defaultValue: Sequelize.fn("now"),
      },
      updatedAt: {
        allowNull: false,
        type: Sequelize.DATE,
        defaultValue: Sequelize.fn("now"),
      },
    },
    {
      sequelize,
      modelName: "Posts",
    }
  );
  return Posts;
};
9. API 작성
sequelize의 API를 실행해보기 전까지 model이 정상적으로 구현되었는지 확인하기 어렵다.
이를 확인하기 위해서 API를 작성해보자
파일 생성
- app.js
const express = require("express");
const postsRouter = require("./routes/posts.route");
const app = express();
const PORT = 3017;

app.use(express.json());
app.use("/api", [postsRouter]);

app.listen(PORT, () => {
  console.log(PORT, "포트 번호로 서버가 실행되었습니다.");
});
- /routes/posts.route.js
const express = require("express");
const { Posts } = require("../models");
const router = express.Router();
const { Op } = require("sequelize"); // sequelize 연산자 문법 Op 사용을 위한 호출

// 게시글 작성 API
router.post("/posts", async (req, res) => {
  const { title, content, password } = req.body;
  const post = await Posts.create({ title, content, password });

  res.status(201).json({ data: post });
});

// 게시글 목록 조회 API
router.get("/posts", async (req, res) => {
  const posts = await Posts.findAll({
    attributes: ["postId", "title", "createdAt", "updatedAt"],
    // 목록 조회이니 게시글 내용과 패스워드는 제외한다.
  });

  res.status(200).json({ data: posts });
});

// 게시글 상세 조회 API
router.get("/posts/:postId", async (req, res) => {
  const { postId } = req.params;
  const post = await Posts.findOne({
    attributes: ["postId", "title", "content", "createdAt", "updatedAt"],
    where: { postId: postId }, // 현재 전달받은 postId 변수값과 일치하는 데이터를 찾아라
  });

  res.status(200).json({ data: post });
});

// 게시글 수정 API
router.put("/posts/:postId", async (req, res) => {
  const { postId } = req.params;
  const { title, content, password } = req.body;

  const post = await Posts.findOne({ where: { postId: postId } });

  // 에러 처리
  if (!post) {
    return res.status(404).json({ message: "게시글이 존재하지 않습니다." });
  } else if (post.password !== password) {
    return res.status(401).json({ message: "비밀번호가 일치하지 않습니다." });
  }

  await Posts.update(
    { title, content }, // 수정할 컬럼이 무엇인가
    {
      where: {
        [Op.and]: [{ postId: postId }, [{ password: password }]],
        // Op.and, sequelize의 연산자 문법. 자바스크립트의 &&와 같은 역할
        // 여기서는 'postId와 password가 모두 일치하는'의 의미이다.
      },
    } // 수정할 대상
  );

  res.status(200).json({ message: "게시글이 수정되었습니다." });
});

// 게시글 삭제 API
router.delete("/posts/:postId", async (req, res) => {
  const { postId } = req.params;
  const { password } = req.body;

  const post = await Posts.findOne({ where: { postId: postId } });
  if (!post) {
    return res.status(404).json({ message: "게시글이 존재하지 않습니다." });
  } else if (post.password !== password) {
    return res.status(401).json({ message: "비밀번호가 일치하지 않습니다." });
  }

  await Posts.destroy({ where: { postId: postId } });

  res.status(200).json({ message: "게시글이 삭제되었습니다." });
});

module.exports = router;
app.js 실행
$ nodemon app.js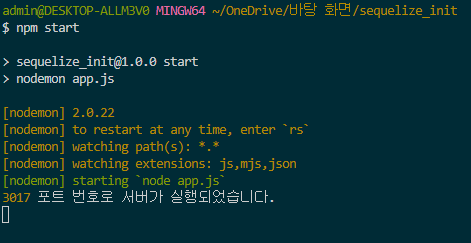
Thunder Client 사용
게시글 작성 API 확인

게시글 목록 조회 API 확인

게시글 상세 조회 API 확인

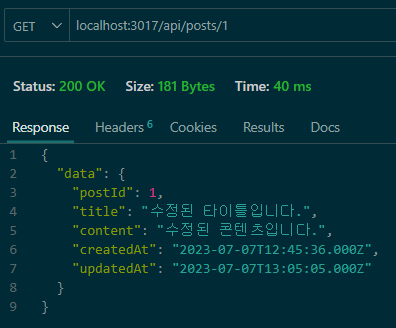
게시글 수정 API 확인

게시글 삭제 API 확인


게시글 상세조회에서는 게시글이 존재하지 않는 에러처리를 별도로 하지 않았기에
null이 나온다.
'공부 > node.js' 카테고리의 다른 글
| 에러 기록 - TypeError: Router.use() requires a middleware function but got a Object (0) | 2023.07.09 |
|---|---|
| MySQL sequelize 연습 기록 2 (0) | 2023.07.08 |
| sequelize - config.json 설정 없이 명령어로 DB 삭제하기 (0) | 2023.07.07 |
| 게시글 조회 API 작성 중 "404 존재하지 않는 게시글입니다." 만들려면 (0) | 2023.06.29 |
| 에러 기록 - SequelizeDatabaseError, sqlMessage: "Unknown column 'postId' in 'field list'" (0) | 2023.06.29 |


