
저장을 습관화
NestJS - multer를 사용하여 S3에 데이터 저장 2 본문
지난 게시글에 이어서..
NestJS - multer를 사용하여 S3에 데이터 저장 1
지난 multer 사용에 이어서.. https://ctrs.tistory.com/437 NestJS - multer를 이용한 미디어 파일 서비스 공식문서 https://docs.nestjs.com/techniques/file-upload Documentation | NestJS - A progressive Node.js framework Nest is a framewor
ctrs.tistory.com
AWS-SDK를 사용하여
multer를 사용하여 데이터를 저장하던 경로를 로컬에서 AWS S3로 변경하는 과정
패키지 설치
npm i aws-sdk
- cats.controllers.ts 내용 추가
// 중략..
import { AwsService } from './../services/aws.service';

@Controller('cats')
@UseInterceptors(SuccessInterceptor)
@UseFilters(HttpExceptionFilter)
export class CatsController {
  constructor(
    // 중략..
    private readonly awsService: AwsService,
  ) {}

  // 중략..
  // before
  // 고양이 이미지 업로드 API - 로컬에 저장
  // uploadCatImg(
  //   @UploadedFiles() files: Array<Express.Multer.File>,
  //   @CurrentUser() cat: Cat,
  // ) {
  //   console.log(files);
  // return this.CatsService.uploadImg(cat, files);
  // }
  //
  //after
  // 고양이 이미지 업로드 API - AWS S3에 저장
  @ApiOperation({ summary: '고양이 이미지 업로드' })
  @UseGuards(JwtAuthGuard)
  @Post('upload')
  @UseInterceptors(FileInterceptor('image'))
  async uploadMediaFile(@UploadedFile() file: Express.Multer.File) {
    console.log(file);
    return await this.awsService.uploadFileToS3('cats', file);
  }

  // 중략..

}
- aws.service.ts 파일 신규 생성
import { BadRequestException, Injectable } from '@nestjs/common';
import * as path from 'path';
import * as AWS from 'aws-sdk';
import { ConfigService } from '@nestjs/config';
import { PromiseResult } from 'aws-sdk/lib/request';

@Injectable()
export class AwsService {
  private readonly awsS3: AWS.S3;
  public readonly S3_BUCKET_NAME: string;

  constructor(private readonly configService: ConfigService) {
    // ConfigService 자체를 의존성 주입을 받아옴으로써
    // process.env.~~ 와 같이 불러오던 .env 환경변수의 내용을
    // '~~'의 방식으로 사용할 수 있게된다.
    this.awsS3 = new AWS.S3({
      // AWS 모듈의 S3클래스를 사용
      accessKeyId: this.configService.get('AWS_S3_ACCESS_KEY'),
      // process.env.AWS_S3_ACCESS_KEY
      secretAccessKey: this.configService.get('AWS_S3_SECRET_KEY'),
      // process.env.AWS_S3_SECRET_KEY
      region: this.configService.get('AWS_S3_REGION'),
      // process.env.AWS_S3_REGION
    });
    this.S3_BUCKET_NAME = this.configService.get('AWS_S3_BUCKET_NAME');
    // process.env.AWS_S3_BUCKET_NAME
  }

  // 데이터를 AWS S3에 저장(업로드)하는 API
  async uploadFileToS3(
    folder: string, // 데이터를 저장할 경로
    file: Express.Multer.File, // controller에서 전달받은 데이터
  ): Promise<{
    key: string;
    s3Object: PromiseResult<AWS.S3.PutObjectAclOutput, AWS.AWSError>;
    contentType: string; // 이미지인지 비디오인지
  }> {
    try {
      const key = `${folder}/${Date.now()}_${path.basename(
        file.originalname,
      )}`.replace(/ /g, '');

      const s3Object = await this.awsS3
        .putObject({
          Bucket: this.S3_BUCKET_NAME,
          Key: key,
          Body: file.buffer,
          ACL: 'public-read',
          ContentType: file.mimetype,
        })
        .promise();
      return { key, s3Object, contentType: file.mimetype };
    } catch (error) {
      throw new BadRequestException(`File upload failed : ${error}`);
    }
  }

  // 데이터를 S3에서 삭제하는 API
  async deleteS3Object(
    key: string,
    callback?: (err: AWS.AWSError, data: AWS.S3.DeleteObjectOutput) => void,
  ): Promise<{ success: true }> {
    try {
      await this.awsS3
        .deleteObject(
          {
            Bucket: this.S3_BUCKET_NAME,
            Key: key,
          },
          callback,
        )
        .promise();
      return { success: true };
    } catch (error) {
      throw new BadRequestException(`Failed to delete file : ${error}`);
    }
  }

  // 데이터의 URL 경로를 반환하는 API
  //   public getAwsS3FileUrl(objectKey: string) {
  //     const s3Url = `aws s3에 저장된 데이터 url https://${this.S3_BUCKET_NAME}.s3.amazonaws.com/${objectKey}`;
  //     console.log(s3Url);
  //     return s3Url;
  //   }
  // 파일이 어디 저장되어 있는지(objectKey) 정보를 전달하면
  // 그에 관한 URL 소스를 제공한다
}
- cats.module.ts
// 중략..
import { AwsService } from './services/aws.service';
import { ConfigModule } from '@nestjs/config';

@Module({
  imports: [
    // 중략..

    ConfigModule.forRoot({
      isGlobal: true,
    }),
    // ConfigModule을 의존성 주입 받음으로써
    // controller, service, repository 등에서
    // process.env.~~ 와 같이 불러오던 .env 환경변수의 내용을
    // '~~'의 방식으로 사용할 수 있게된다.
  ],
  controllers: [CatsController],
  providers: [CatsService, CatsRepository, AwsService],
  exports: [CatsService, CatsRepository],
})
export class CatsModule {}
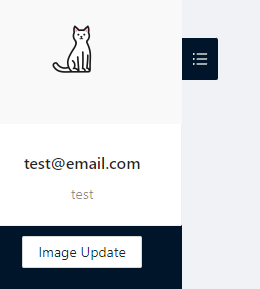
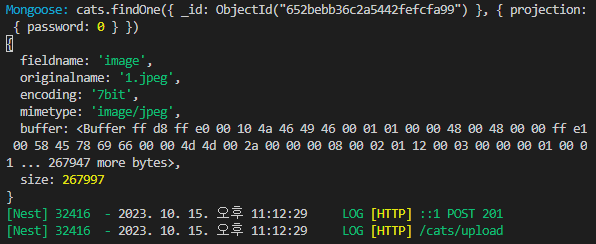
이후 프론트엔드에서 Image Update를 해주면

아래와 같이 로그가 발생하고
AWS S3로 돌아와서 새로고침을 해보면
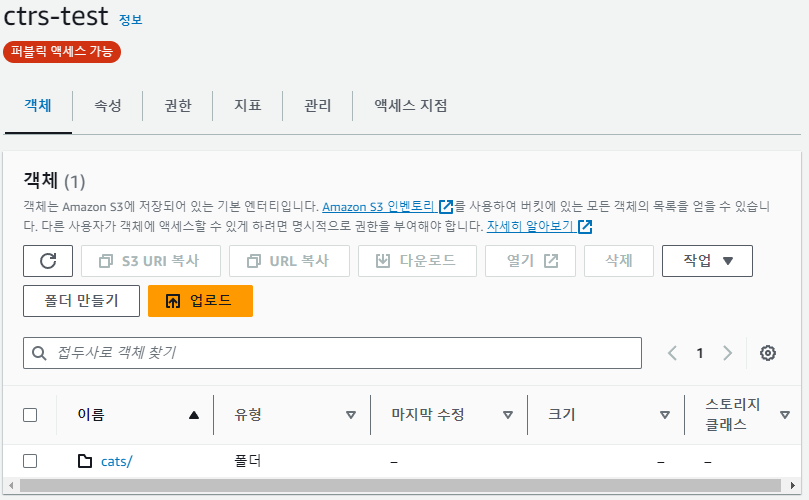

cats 폴더와 jpeg 파일이 저장되어 있는 것까지는 확인을 하였으나
이 이미지 파일의 경로(https://ctrs-test.s3.ap-northeast-2.amazonaws.com/cats/1697383988970_1.jpeg)를 다시 불러와
프론트엔드에 띄우는 방법은 아직 완성되지 않아서 다음에..