
저장을 습관화
과제 기록 - Node.js, express, MongoDB, mongoose, AWS EC2 본문
이번 과제에서 한 내용 요약
- Node.js, express를 통한 웹 서비스와 CRUD 기능이 담긴 REST API 구축
- MongoDB/mongoose를 통한 DB 구축
- 구축한 서비스를 AWS EC2를 통하여 배포
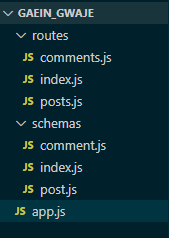
1. 과제 요구 조건에 맞춘 Directory Stucture 구성
- 요구 조건
.
├── app.js
├── routes
│   ├── index.js
│   ├── comments.js
│   └── posts.js
└── schemas
    ├── index.js
    ├── comment.js
    └── post.js
- 생성
2. package.json 생성
$ npm init
$ npm init -y를 입력하여 입력사항을 전부 생략하고 바로 설치도 가능하다
모든 질문사항에 yes를 입력한 것과 같다

3. express 설치
$ npm install express

4. express를 통한 웹 서버 가동 확인
- app.js
const express = require("express");
const app = express();
const port = 3000;

app.get("/", (req, res) => {
  res.send("Hello World!");
});

app.listen(port, () => {
  console.log(port, "포트로 서버가 열렸어요!");
});
- 터미널
$ node app.js

※ 만약 웹 접속이 안된다면 express의 실행을 중지하고
기존에 3000 포트를 사용하고 있던 프로그램이 있는지 확인한다
VSC 확장 프로그램 Thunder Client를 사용하여 실행 결과와 더불어 상태코드도 확인할 수 있다.

HTTP 메소드는 GET을 선택, 상단 입력창에 localhost:3000을 입력하고 SEND를 클릭하면
상태코드 200과 함께 어떤 결과가 출력되는지 확인 가능하다
[참조]
HTTP의 상태 코드
https://developer.mozilla.org/ko/docs/Web/HTTP/Status
HTTP 상태 코드 - HTTP | MDN
HTTP 응답 상태 코드는 특정 HTTP 요청이 성공적으로 완료되었는지 알려줍니다. 응답은 5개의 그룹으로 나누어집니다: 정보를 제공하는 응답, 성공적인 응답, 리다이렉트, 클라이언트 에러, 그리고
developer.mozilla.org
5. 웹 서버 내용 추가
- posts.js
const express = require("express"); // express를 할당받는다
const router = express.Router(); // 객체 express 안에 있는 함수 Router()를 실행시켜 그 값을 변수 router에 할당한다

// localhost:3000/api/ 접근 시 출력되는 내용
router.get("/", (req, res) => {
  res.send("default url for posts.js GET Method");
});

// localhost:3000/api/about으로 접근했을때 출력되는 내용
router.get("/about", (req, res) => {
  res.send("posts.js about PATH");
});

module.exports = router;
// 위 내용을 app.js로 보내기 위한 export
- app.js
const express = require("express");
const app = express();
const port = 3000;
const postsRouter = require("./routes/posts.js"); // /routes/posts.js의 내용을 받아와 변수 postsRouter에 할당한다

app.get("/", (req, res) => {
  res.send(`Hello World! <br>
  안녕하세요 정호중입니다. <br>
  제 블로그는 https://ctrs.tistory.com/ 입니다.`);
});

app.use("/api", postsRouter); // app.use는 express에게 모든 미들웨어가 이 곳을 통과할것이다라는 것을 알려주기 위함
// 기본 URL 뒤 /api 가 경로로서 추가될 경우 사용자를 postsRouter 라우터로 보낸다.
// localhost:3000/api -> postsRouter

app.listen(port, () => {
  console.log(port, "포트로 서버가 열렸어요!");
});


6. 웹 서버 조회 기능 확인
- posts.js
---(중략)---
// posts(게시글)의 카테고리
const posts = [
  {
    postsId: 1,
    postsAuthor: "jhj",
    postPw: "1234", //number로 사용할 예정
    postTitle: "test",
    postCnt: "content",
    postDate: Date,
  },
];

// posts 모두 조회
router.get("/posts", (req, res) => {
  res.status(200).json({ posts: posts });
});

module.exports = router;
// 위 내용을 app.js로 보내기 위한 export
express 재실행 후
http://localhost:3000/api/posts 접속

JSON 형태로 출력되는것이 확인
하지만 위와 같은 형태도 내용이 많으면 읽기가 힘드니
크롬 브라우저 확장 프로그램 JSONVue 설치


게시글 목록 posts에서 postId를 기준으로 하나만 검색하려면
- posts.js
---(중략)---
// posts 하나만 검색
router.get("/posts/:postsId", (req, res) => {
  const { postsId } = req.params;

  let result = null;

  for (const post of posts) {
    if (Number(postsId) === post.postsId) {
      result = post;
    }
  }

  // 위 for문은 아래와 같이 한줄로 축약할 수도 있음
  // const [result] = goods.filter((good) => Number(postsId) === this.post.postsId);

  res.status(200).json({ detail: result });
});

module.exports = router;
// 위 내용을 app.js로 보내기 위한 export
http://localhost:3000/api/posts/1

http://localhost:3000/api/posts/99

7. DBMS - MongoDB와 mongoose, studio 3T 사용
1) MongoDB 설치 - Windows 10 기준
C드라이브에 data\db 폴더를 생성한다

2) MongoDB 설치 파일 다운로드, 실행
https://www.mongodb.com/try/download/community
Try MongoDB Community Edition
Try MongoDB Community Edition on premise non-relational database including the Community Server and Community Kubernetes Operator for your next big project!
www.mongodb.com
※ 설치 중 주의할 점
설치 경로를 사전에 만들었던 c:\data\db로 지정한다.

MongoDB Compass는 설치하지 않는다.

3) 설치 완료 후
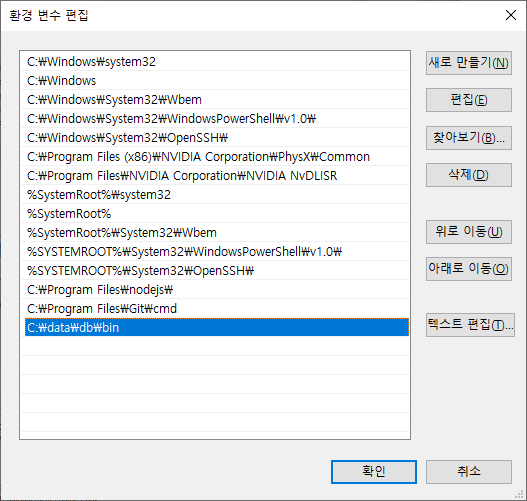
제어판 -> 시스템 및 보안 -> 시스템 -> 고급 시스템 설정 -> 고급 -> 환경 변수 -> 시스템 변수 에서
Path에 MongoDB의 경로 C:\data\db\bin를 추가한다.
4) 설치 확인
윈도우의 cmd 창에서 아래 명령어를 입력한다.
mongod --install --serviceName MongoDB --serviceDisplayName MongoDB --dbpath C:\data\db --logpath C:\data\db\log\mongoservice.log --logappendMongoDB가 제대로 설치되지 않았다면 내부 또는 외부 명령.....이 아닙니다. 라는 메세지가 나오지만
제대로 설치되었다면 아무런 메세지도 나오지 않고 명령이 완료된 듯한 표시가 나오게 된다.
이전 버전의 MongoDB에서는 cmd에 mongo 를 입력하여 현재 버전을 확인할 수 있었으나
6.0 버전 부터는 mongo를 입력하여도 내부 또는 외부 명령.. 이 아닙니다.라는 메세지가 나온다.
대신 웹 브라우저에서 localhost:27017에 접속하는 방법으로 정상적으로 설치되었는지 확인할 수 있다.

MongoDB 설치 완료
5) Studio 3T 설치
Robo 3T | Free, open-source MongoDB GUI (formerly Robomongo)
Read by Dmitry Schetnikovich
robomongo.org
Studio 3T의 설치 중 주의 사항은 없다.
구글 계정으로 로그인하고, 디폴트 설정으로 설치한다.
8. DB 연결
1) studio 3T 실행
좌측 상단 Connect -> New Connection

Manually configure my connection settings 체크, Next

Connection Name 지정, 서버와 port는 디폴트 사용, Save
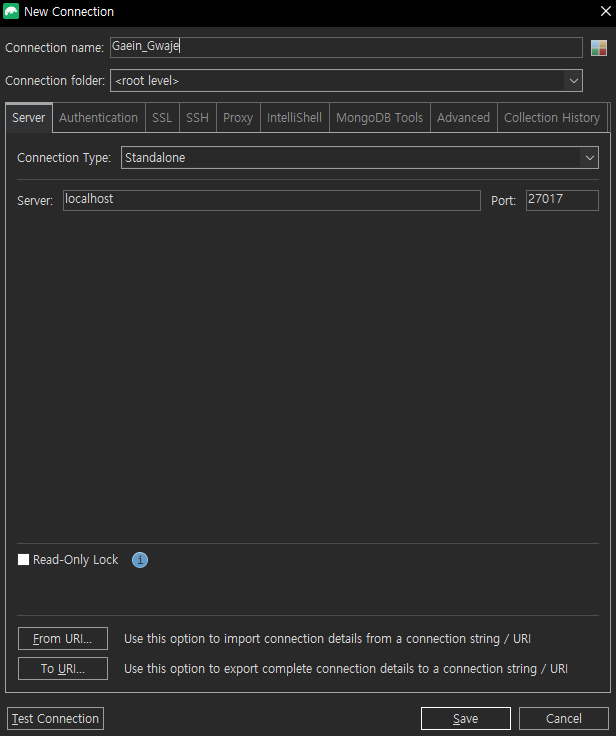
Connection Manager 서버 목록으로 돌아와서
새로 지정한 서버 선택, Connect
2) 서버가 연결 되었으면 연결된 서버를 우클릭, Add Database... 클릭

DB명 지정 후 OK 선택

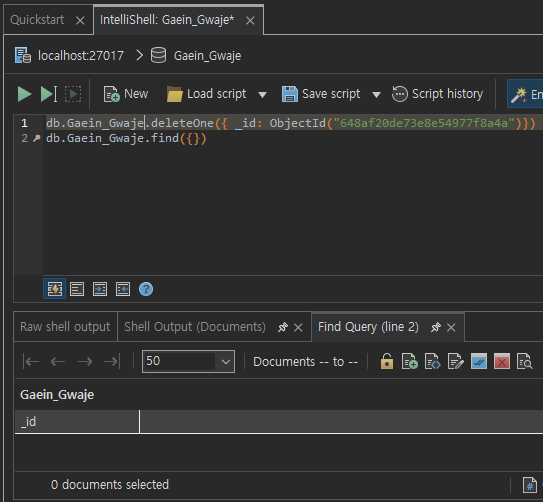
3) Studio 3T GUI를 이용한 기본 사용법, DB 우클릭, Open IntelliShell 클릭

db.Gaein_Gwaje.insertOne({ key: "value", key2: "값" }) // 내용 추가

db.Gaein_Gwaje.find({}) // 내용 조회

db.Gaein_Gwaje.deleteOne({ _id: ObjectId("...")}) // 내용 삭제, "..."에 _id의 내용이 들어가야한다.
- 내용 추가 및 조회

- 내용 삭제 및 조회
9. express 내부에서 MongoDB 사용하기
1) mongoose 설치
$ npm install mongoose
2) /schemas/index.js 파일 생성
const mongoose = require("mongoose"); // mongoose 라이브러리를 가져와 변수 mongoose에 할당한다.

const connect = () => {
  mongoose
    .connect("mongodb://127.0.0.1:27017/Gaein_Gwaje") // mongoose로 연결할 mongoDB 서버와 DB를 입력한다.
    // 주소는 localhost도 가능하지만 127.0.0.1로 적는 편이 좋다.
    .catch((err) => console.log(err));
  // MongoDB에 연결시 실패하였을 경우 err 로그를 남긴다.
};

mongoose.connection.on("error", (err) => {
  // MongoDB에 연결이 실패하였을 경우 에러 로그 발생
  console.error("몽고디비 연결 에러", err);
});

module.exports = connect;
// 위 내용을 app.js에서 쓰기위한 exports
mongoose를 이용하여 mongoDB 서버에 접근할때 localhost 대신 127.0.0.1을 쓴 이유
에러 기록 - MongooseServerSelectionError: connect ECONNREFUSED ::1:27017
순서 1. 에러 발생 상황과 증상 2. 해결 방법 1. 에러 발생 상황과 증상 node.js 공부 중 app.js 파일에서 express를 이용해 웹서버를 가동시키고, ./schemas/index.js에 등록되어있는 내용에 따라 mongoDB에 연
ctrs.tistory.com
3) routes/posts.js
const express = require("express"); // express를 할당받는다

const router = express.Router(); // 객체 express 안에 있는 함수 Router()를 실행시켜 그 값을 변수 router에 할당한다

const posts = [
  {
    postsId: 1,
    user: "test",
    password: "1234",
    title: "test title",
    content: "test content",
    createdAt: "",
  },
  {
    postsId: 2,
    user: "test2",
    password: "1234",
    title: "test title2",
    content: "test content",
    createdAt: "",
  },
];

// localhost:3000/api/ 접근 시 출력되는 내용
router.get("/", (req, res) => {
  // res.send("default url for posts.js GET Method");
  res.send("/posts와 /comments를 확인해주세요");
});

// posts 목록 조회 API
router.get("/posts", (req, res) => {
  res.json({ posts: posts });
});

// posts 상세 조회 API
router.get("/posts/:postsId", (req, res) => {
  const { postsId } = req.params;

  let result = null;

  for (const post of posts) {
    if (Number(postsId) === post.postsId) {
      result = post;
    }
  }

  res.status(200).json({ detail: result });
});

// 게시글 작성
const Posts = require("../schemas/post.js");
router.post("/posts/", async (req, res) => {
  const { postsId, user, password, title, content, createdAt } = req.body;
  const posts = await Posts.find({ postsId });

  if (posts.length) {
    // posts의 길이가 0이 아니라는 것은 내용이 있다는 의미이다.
    return res.status(400).json({
      success: false,
      errorMessage: "이미 존재하는 postsId입니다.",
    });
  }
  const createdPosts = await Posts.create({
    postsId,
    user,
    password,
    title,
    content,
    createdAt,
  });

  res.json({ posts: createdPosts });
});

module.exports = router;
// 위 내용을 app.js로 보내기 위한 export
4) /schemas/post.js
const mongoose = require("mongoose");

const postsSchema = new mongoose.Schema({
  postsId: {
    type: Number,
    required: true, // 이 값은 필수적이다.
    unique: true, // 이 값은 유일하다.
  },
  user: {
    type: String,
    required: true,
  },
  password: {
    type: String, // 문자와 숫자를 혼합한 패스워드를 사용할 수도 있으므로 데이터 타입은 문자열을 사용한다.
    required: true,
  },
  title: {
    type: String,
    required: true,
  },
  content: {
    type: String,
    required: true,
  },
  createdAt: {
    type: Date,
  },
});

module.exports = mongoose.model("posts", postsSchema);
5) 게시글 작성 테스트 (CRUD 중 Create)
http 메소드: post
경로: localhost:3000/api/posts
Body JSON Content:
{
   "postsId": 3,
   "user": "POST Test",
   "password": "1234",
   "title": "post test",
   "content": "is it work?",
   "createdAt": "2023-06-15T14:29:07.654Z"
}
SEND를 클릭하였고, 정상적으로 DB에 추가된 것 확인


10. 게시글의 수정과 삭제
// 게시글 수정, put
router.put("/posts/:postsId", async (req, res) => {
  const { postsId } = req.params;
  const { content } = req.body;
  const existPosts = await Posts.find({ postsId });

  if (existPosts.length) {
    await Posts.updateOne({ postsId: postsId }, { $set: { content: content } });
    // postsId가 일치할때 content의 내용을 새로 입력받은 content로 교체하겠다는 의미
    // $set은 MongoDB의 업데이트 연산자이다.
  }
  res.status(200).json({ success: true });
});

// 게시글 삭제, delete
router.delete("/posts/:postsId", async (req, res) => {
  const { postsId } = req.params;
  const existPosts = await Posts.find({ postsId });

  if (existPosts.length) {
    await Posts.deleteOne({ postsId });
  }

  res.json({ result: "삭제 완료" });
});
스크린샷 생략
'공부 > node.js' 카테고리의 다른 글
| .toHexString() (0) | 2023.06.19 |
|---|---|
| node.js mongoose 시간 적는 법 (0) | 2023.06.19 |
| 에러 기록 - MongoServerError: E11000 duplicate key error (0) | 2023.06.18 |
| mongoose의 __V 필드 (0) | 2023.06.15 |
| 에러 기록 - MongooseServerSelectionError: connect ECONNREFUSED ::1:27017 (0) | 2023.06.15 |


