
저장을 습관화
NestJS - multer를 이용한 미디어 파일 서비스 본문
공식문서
https://docs.nestjs.com/techniques/file-upload
Documentation | NestJS - A progressive Node.js framework
Nest is a framework for building efficient, scalable Node.js server-side applications. It uses progressive JavaScript, is built with TypeScript and combines elements of OOP (Object Oriented Programming), FP (Functional Programming), and FRP (Functional Rea
docs.nestjs.com
이미지, mp3, mp4 등의 미디어 파일 업로드를 처리하기 위해
nest는 express용 multer 미들웨어 패키지 기반 내장 모듈을 제공한다
$ npm i -D @types/multer
업로드의 내용이 있는 컨트롤러에 아래 내용을 추가한다
- cats.controller.ts
import { UseInterceptors } from '@nestjs/common';
import { FileInterceptor, FilesInterceptor } from '@nestjs/platform-express';
import { UploadedFiles } from '@nestjs/common/decorators';

// 중략..

export class CatsController {
// 중략..

// 고양이 이미지 업로드
  @ApiOperation({ summary: '고양이 이미지 업로드' }) // swagger 주석
  // @UseInterceptors(FileInterceptor('image')) // multer를 위해 추가해야할 부분, 단일 파일
  @UseInterceptors(FilesInterceptor('image')) // multer를 위해 추가해야할 부분, 복수 파일
  @Post('upload')
  uploadCatImg(@UploadedFiles() files: Array<Express.Multer.File>) {
    return 'uploadImg';
  }

// 중략..
}
단일 파일을 업로드하려면 FileInterceptor() 인터셉터를 사용하고
post request로 보내져온 파일을 UploadedFile에서 확인 가능하다.
복수의 파일을 업로드하려면 FilesInterceptor()인터셉터를 사용하고,
post request로 보내져온 파일을 @UploadedFiles() 데코레이터를 사용해 활용한다.
이후 관련 module 파일에도 내용을 추가한다
- cats.module.ts
// 중략..
import { MulterModule } from '@nestjs/platform-express';

@Module({
  imports: [
    MulterModule.register({
      dest: './upload',
      // dest는 'destination'의 약자로 뒤에 오는 경로에 저장된다는 의미이다.
    }),
// 중략..
});
이후 프론트엔드에서 이미지를 업로드하면


성공적으로 이미지가 업로드되었음을 확인할 수 있다.
어플리케이션의 루트 디렉토리에 upload 폴더와 확장자명이 없는 파일이 생성된 것을 확인할 수 있다.

다만 이 상태로는 사용할 수 없으니 작업을 더 진행한다.
- /src/common/utils/multer.options.ts 파일 생성

import * as multer from 'multer';
import * as path from 'path';
import * as fs from 'fs';
import { MulterOptions } from '@nestjs/platform-express/multer/interfaces/multer-options.interface';

const createFolder = (folder: string) => {
  try {
    console.log('💾 Create a root uploads folder...');
    fs.mkdirSync(path.join(__dirname, '..', `uploads`));
    // fs.mkdir 폴더를 생성한다.
    // 현재 폴더의 부모 폴더로 올라가 'uploads' 폴더를 생성한다.
  } catch (error) {
    console.log('The folder already exists...');
    // 이미 'uploads' 폴더가 존재하는 경우
  }

  try {
    console.log(`💾 Create a ${folder} uploads folder...`);
    fs.mkdirSync(path.join(__dirname, '..', `uploads/${folder}`));
    // 상단에서 생성했던 'uploads'폴더에 하위 폴더를 만든다.
    // 폴더명은 매개변수 folder를 따른다.
  } catch (error) {
    console.log(`The ${folder} folder already exists...`);
    // 이미 해당 폴더가 존재하는 경우
  }
};

const storage = (folder: string): multer.StorageEngine => {
  createFolder(folder);
  // 함수 createFolder의 내용을 따라 폴더를 생성한다.
  // 폴더명은 매개변수 folder가 된다.
  return multer.diskStorage({
    destination(req, file, cb) {
      // destination. 어디에 저장할 지
      const folderName = path.join(__dirname, '..', `uploads/${folder}`);
      cb(null, folderName);
      // 함수 destination의 옵션 cb는 callback의 약자
      // 첫번재 옵션은 error, 두번째 옵션이 destination(목적지)에 대한 내용
    },

    filename(req, file, cb) {
      // filename. 어떤 이름으로 올릴 지
      const ext = path.extname(file.originalname);
      // extname()메소드 업로드한 파일을 읽어서 확장자를 추출한다.
      // 예를들어 index.html을 업로드하면 .html을 반환한다.
      // .originalname:
      // (property) Express.Multer.File.originalname: string
      // Name of the file on the uploader's computer.
      const fileName = `${path.basename(
        file.originalname,
        ext,
      )}${Date.now()}${ext}`;
      // 업로드 파일의 원본 이름과 학장자명을 붙여 변수 fileName에 할당한다.
      // 기존 파일가 겹치면 에러가 발생할 수 있으니 업로드 당시의 시간도 함께 붙인다.

      cb(null, fileName);
      // 함수 destination의 옵션 cb는 callback의 약자
      // 첫번재 옵션은 error, 두번째 옵션이 파일의 이름에 대한 내용
    },
  });
};

export const multerOptions = (folder: string) => {
  // upload폴더에 하위 폴더를 만들어 준다.
  const result: MulterOptions = {
    storage: storage(folder),
  };
  // MulterOptions의 타입 storage
  // 상단에 위치한 함수 storage의 결과를 할당한다
  return result;
};
- cats.controller.ts
import { UseInterceptors } from '@nestjs/common';
import { FileInterceptor, FilesInterceptor } from '@nestjs/platform-express';
import { UploadedFiles } from '@nestjs/common/decorators';
import { multerOptions } from '../common/utils/multer.options';
// 중략..
export class CatsController {
// 중략..
// 고양이 이미지 업로드
@ApiOperation({ summary: '고양이 이미지 업로드' })
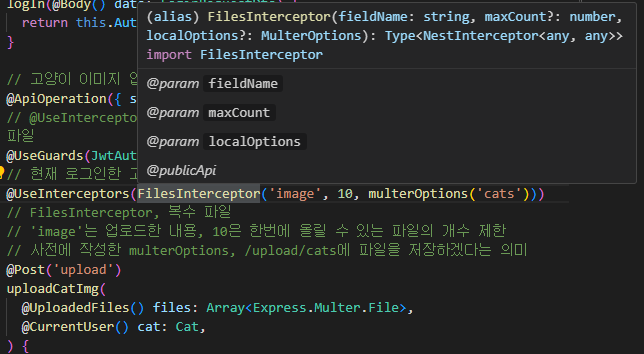
@UseInterceptors(FilesInterceptor('image', 10, multerOptions('cats')))
// 'image'는 업로드한 내용, 10은 한번에 올릴 수 있는 파일의 개수 제한
// 사전에 작성한 multerOptions, /upload/cats에 파일을 저장하겠다는 의미
@Post('upload')
uploadCatImg(@UploadedFiles() files: Array<Express.Multer.File>) {
console.log(files);
return 'uploadImg';
}
// 중략..
}
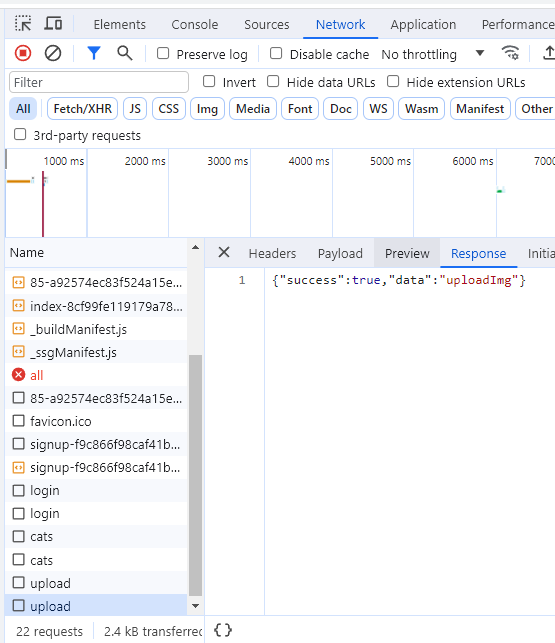
다시 업로드 테스트

console.log(files)와 브라우저의 개발자 도구에서 업로드 성공 확인
로그에 찍힌 경로(/dist/common/uploads/cats)에 찾아가보면

브라우저를 통해 업로드한 파일이 저장되어 있음을 확인할 수 있다.
/dist는 /src에서 작성한 타입스크립트를 자바스크립트로 컴파일한 내용이 들어가는 곳이다.
즉 컴파일 때마다(백엔드 서버를 켤때마다) 내용이 /dist의 내용은 새로 생성되므로
기존에 업로드된 이미지 파일은 삭제된다.
저장된 파일이 날아가는 것을 막기 위해서 저장하는 경로는 외부(AWS S3 등)을 사용하도록 하자
- 업로드한 이미지를 프론트엔드에서 확인하기
1. 데이터베이스에 업로드한 파일의 경로 저장
2. 프론트엔드에서 경로를 호출하여 이미지를 띄운다.
- main.ts 내용 추가
// 중략..
import * as path from 'path';
import { NestExpressApplication } from '@nestjs/platform-express';

async function bootstrap() {
  const app = await NestFactory.create<NestExpressApplication>(AppModule);
  // NestExpressApplication을 통해 app이 익스프레스 앱이라고 명시적으로 표현

  // 중략..

  // 미디어 파일의 경로를 반환하는 부분
  // app이 익스프레스 앱이 아닐 경우 Static 파일을 사용할 수 없다.
  app.useStaticAssets(path.join(__dirname, './common', 'uploads'), {
    prefix: '/media',
  });
  // 'http://localhost:8000/media/cats/file.png'와 같은 양식으로 나오게된다.

  // 중략..
}
bootstrap();
예시)

- cats.schema.ts 내용 추가
// 중략..
@Schema(options)
export class Cat extends Document {
// 중략..
  @Prop({
    default:
      'https://cdn.dribbble.com/users/5517074/screenshots/12085846/cat_logo.png',
  }) // 디폴트 이미지, 아무것도 업로드 하지 않았을때 나오는 이미지
  @IsString()
  imgUrl: string;

  readonly readOnlyData: {
    id: string;
    email: string;
    name: string;
    imgUrl: string; // 이미지 url 출력 부분 추가
  };
}

// virtual field
CatSchema.virtual('readOnlyData').get(function (this: Cat) {
  return {
    id: this.id,
    email: this.email,
    name: this.name,
    imgUrl: this.imgUrl, // 이미지 url 출력 부분 추가
  };
});
- cats.controller.ts 내용 추가
import { UseInterceptors } from '@nestjs/common';
import { FileInterceptor, FilesInterceptor } from '@nestjs/platform-express';
import { UploadedFiles } from '@nestjs/common/decorators';
import { multerOptions } from '../common/utils/multer.options';
import { Cat } from '../cats.schema';

// 중략..

export class CatsController {
// 중략..

  // 고양이 이미지 업로드
  @ApiOperation({ summary: '고양이 이미지 업로드' })
  @UseGuards(JwtAuthGuard)
  // 현재 로그인한 고양이의 이미지를 가져오려면, 자신을 인증해야하므로 사용
  @UseInterceptors(FilesInterceptor('image', 10, multerOptions('cats')))
  // 'image'는 업로드한 내용, 10은 한번에 올릴 수 있는 파일의 개수 제한
  // 사전에 작성한 multerOptions, /upload/cats에 파일을 저장하겠다는 의미
  @Post('upload')
  uploadCatImg(
    @UploadedFiles() files: Array<Express.Multer.File>,
    @CurrentUser() cat: Cat,
  ) {
    console.log(files);
    return this.CatsService.uploadImg(cat, files);
  }
}
- cats.service.ts 내용 추가
// 중략..

@Injectable()
export class CatsService {

  // 고양이의 이미지 업로드 API
  async uploadImg(cat: Cat, files: Express.Multer.File[]) {
    const fileName = `cats/${files[0].filename}`;
    console.log(fileName);

    const newCat = await this.CatsRepository.findByIdAndUpdateImg(
      cat.id,
      fileName,
    );
    console.log(newCat);
    return newCat;
  }

// 중략..
}
- cats.repository.ts
// 중략..
@Injectable()
export class CatsRepository {
// 중략..

  // 고양이의 이미지를 업데이트
  async findByIdAndUpdateImg(id: string, fileName: string) {
    const cat = await this.catModel.findById(id);
    cat.imgUrl = `http://localhost:8000/media/${fileName}`;
    const newCat = await cat.save(); // save() 메소드, 저장
    console.log(newCat);
    return newCat.readOnlyData;
  }

// 중략..
}
- 확인
기존에 엑스박스로 나오던 이미지 표시 부분이
디폴트 이미지로 대체됨을 확인

Image Update를 눌러 프로필 사진을 업로드
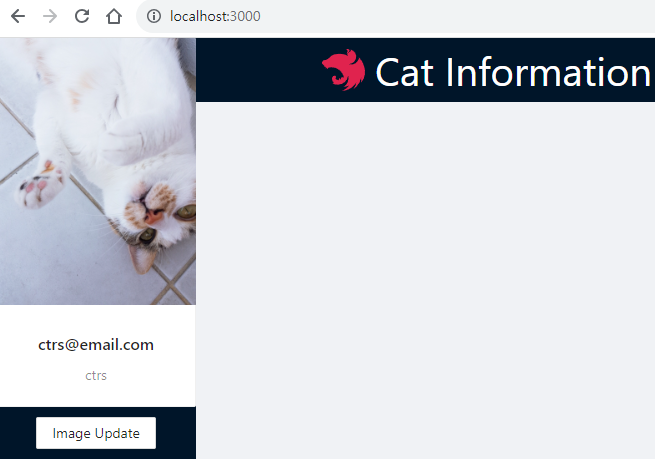
업로드한 사진으로 변경됨을 확인
DB확인

이미지를 업데이트한 'ctrs'는 서버 내 이미지 파일의 경로가,
새로 가입하여 아직 이미지를 업로드 하지 않은 'testtest'는 디폴트 사진의 경로가 DB에 저장되어 있음을 확인
[추가] 프론트엔드가 아닌 postman 등을 이용하여 이미지를 업로드할 경우
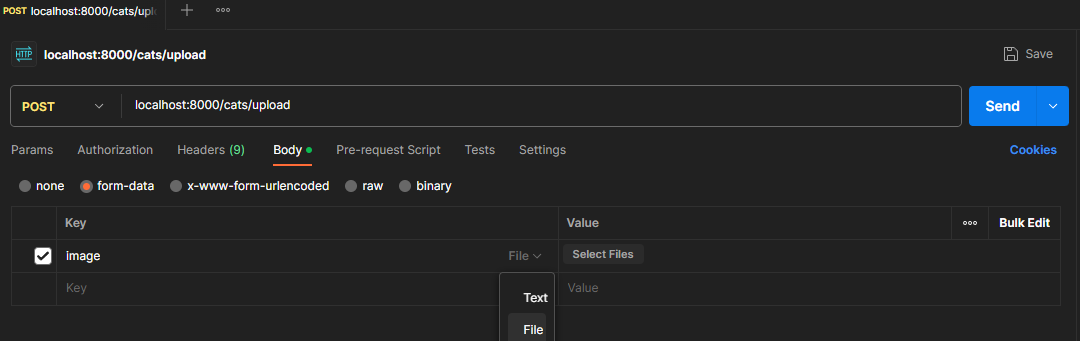
Body, for-data를 선택하고, Key는 'image'를 입력한다.
컨트롤러에서 @UserInterceptors(FilesInterceptor())를 이용하여 이미지를 업로드할 때,
이미지의 fileName을 'image'라고 지정했기 때문이다.
그 후 기존 Text로 되어있던 Value를 File로 변경하고, Select Files를 클릭하면
파일 탐색기가 열린다.


이 후 Send를 클릭하면 프론트엔드를 거치지 않고도 이미지 업로드 테스트를 진행할 수 있다.
[추가 2]
만약 수많은 미디어를 저장하게 되어 디스크에 부담이 예상될 경우
sharp(https://sharp.pixelplumbing.com/api-resize#examples) 등 패키지를 사용하여
이미지 용량을 최적화하여 저장하기도 한다.
단 이 최적화 작업을 백엔드 서비스 코드에서 진행할 경우 병목현상이 발생할 수 있으므로
AWS Lambda(https://docs.aws.amazon.com/ko_kr/lambda/latest/dg/welcome.html)를 사용하여
S3에 저장하는 방법도 있으니 기억해두자
'공부 > node.js' 카테고리의 다른 글
| NestJS - socket.emit, socket.on 연습 기록 (0) | 2023.10.19 |
|---|---|
| NestJS - multer를 사용하여 S3에 데이터 저장 1 (0) | 2023.10.14 |
| NestJS - Swagger를 사용해서 API 문서 만들기 (0) | 2023.10.04 |
| NestJS - 회원 가입 API 개발시 패스워드 암호화하기, mongoose virtual field 사용하기 (0) | 2023.10.02 |
| 에러 기록 - export class Cat extends Document... ReferenceError: Document is not defined (0) | 2023.10.02 |


